 Shop
Shop My
My Custom


FREE 5-Ingredient Recipe EBook
GET IT NOWI’ve got lots of egg recipes, but let’s be real, sometimes you just want to boil them for quick snacks (or other healthy recipes). Enter this method for hard boiled eggs in the oven. I came up with this one day when I needed them for another dish and was busy cooking 3 things at the same time (!), so didn’t want to keep an eye on boiling water. Since then, I’ve tested over and over again to get the timing just right — and lately, to improve it based on your feedback. So, for those days when you don’t want to babysit the stove, make these baked hard boiled eggs with me!
Why You Need My Baked Boiled Eggs Recipe

- No boiling water to watch – Is this oven method better than (my go-to) easy peel boiled eggs the stove top? Not necessarily, but I love that I can just set a timer, flip them once, and do something else without watching the stove.
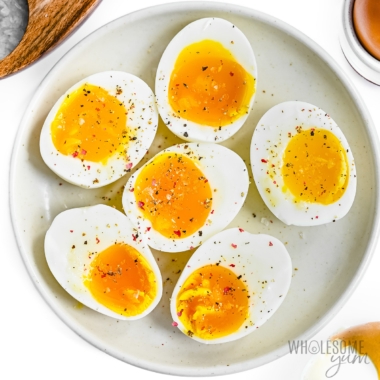
- Cook the egg yolks the way you like them – Whether you like them soft, jammy, or fully set, I’ve got a time chart to help you boil eggs in the oven perfectly. For my picture below, I pulled them at different times to show various doneness levels.
- No brown spots – I’ve had this recipe for a while, but some of you complained that your eggs had a brown spot where they touched the pan. I now have new tips to avoid this issue, and (bonus!) this gives the whites a better texture, too.
- Perfect to meal prep a large batch – I love this method for making dozens of eggs as once without using a giant pot. Since they store well, this is perfect for on-the-go breakfast, snacks, salads, or even Easter.


How To Make Hard Boiled Eggs In The Oven
I have step-by-step photos here to help you visualize the recipe. For full instructions with amounts and temperatures, see the recipe card.
- Place eggs in a muffin tin. While your oven preheats, line a muffin tin with silicone cups like this, and place an egg in each. (Paper cups won’t work!)

I actually couldn’t find my muffin cups when I recently re-tested this recipe, so I tried just pressing foil over the tin and making little cradles for the eggs — and this works, too! (See below for a visual.)

- Hard boil eggs in the oven. Bake them on the middle oven rack, and use my time chart below to get the doneness you like.
- Remember the ice water bath. Towards the end, fill a large bowl of ice water, and submerge the cooked eggs immediately after baking. (You can also run cold water from the sink, but I don’t like wasting so much water.) Let them chill for 10 minutes before peeling.

My Recipe Tips
- Lining underneath the eggs is crucial to prevent brown spots. I used to place the eggs directly in a muffin tin, but they sometimes got brown spots where they touched the metal — and many of you said this in older comments, too. The 2 methods I showed above (either silicone muffin cups or the foil method) both work beautifully to avoid this issue.
- A light colored muffin tin further avoids brown spots. I used a darker one for these pictures and they still turned out okay, but I find that this lighter muffin tin gets more more consistent results. (I prefer it for actual muffins as well, because they don’t get as dark on the bottom!)
- If using the foil method, don’t press it all the way down. Otherwise, it’ll be the same as using no foil at all. You want wells that raise the eggs away from the metal. This isn’t an issue with silicone cups, since they don’t conduct heat well.
- Don’t forget to flip halfway through. This is important for even cooking! The partially baked boiled eggs will be very hot at this point but still runny inside, so use tongs to flip and be careful not to crack the shell.
- My cook times (below) are for cold eggs, straight out of the fridge. Room temperature eggs will cook a couple minutes faster.
- Making a smaller batch? I actually recommend either the stove or boiling eggs in the air fryer for that, but if you still make your hard boiled eggs in the oven, fill any empty cups with water. This will prevent your pan from warping.
- If you live at high altitude, the times will take longer. Unfortunately, I can only test in my kitchen at sea level, so don’t have specific recommendations for how much longer.
- This method works best for hard boiled, soft boiled, or a jammy in-between that isn’t precise. This is because ovens vary, and the heat isn’t quite as uniform as the stovetop. I have a time chart below, but if you want them done a very specific way, my stovetop hard boiled eggs method is more reliable for precise results.
- Don’t bake hard boiled eggs in the oven for longer than 28 minutes. I find that any longer causes the eggshells to crack, a green ring can form around the yolk, and the white puffs outside the shell. They can even burst!
- The ice bath is super important for easy peeling, and to prevent overcooking. After 10 minutes, roll each egg on the counter with the palm of your hand to crack it all over, especially near the middle — this helps the shell separate from the white. Then, start peeling at the wider end, which usually has an air pocket. Of course, if your eggs are soft boiled, you’re better off eating them with a spoon directly from the shell.
How Long To Cook Eggs In The Oven?
Most sites say 30 minutes at 325-350 degrees F, but in my experience, 30 minutes is a bit too long. 28 minutes is better for firm hard boiled eggs in the oven. And I wanted to show you what the cook times look like, so you can pick your perfect doneness — hard, soft, or in between!
Baking time can vary a bit depending on your oven and egg size (I use large pastured eggs), so you may need to tweak by a minute or two. Here’s my time chart that always works for me:
| Oven Time | Result |
|---|---|
| 20 minutes | Runny soft boiled |
| 22 minutes | Between runny and jammy |
| 24 minutes | Jammy |
| 26 minutes | Softer hard boiled |
| 28 minutes | Firm hard boiled |

Ways To Enjoy Them
After cooking your hard boiled eggs in the oven (or soft boiled ones), you can use them just like you would if you cooked them the regular way. Here are some of my favorite ways:
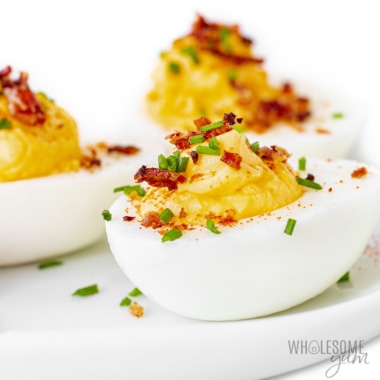
- Hard boiled eggs – Endless possibilities here! Grab them for a snack with salt and pepper, chop them up for a salad, or turn them into deviled eggs, to name a few. My favorite salad options with them are a classic egg salad (or avocado egg salad), Cobb salad, 7-layer salad, and cauliflower potato salad.
- Soft boiled eggs – Aside from eating them with a spoon (of course), I love a soft boiled egg over avocado or guacamole toast, on a breakfast sandwich with bacon and cheese, in ramen soup, or over a Cobb salad.
Hard Boiled Eggs In The Oven (No Spots)
Make perfect baked hard boiled eggs in the oven — no brown spots or boiling water to watch! Use my time chart for hard, soft, or jammy.
Instructions
Tap on the times in the instructions to start a kitchen timer.
-
Preheat the oven to 325 degrees F (163 degrees C).
-
Line a muffin tin with silicone muffin cups. If you don’t have any, place a large piece of foil over the muffin tin and push down lightly to form a cradle for each egg, without going all the way to the bottom of the pan.
-
Place one egg in each silicone cup or into the foil wells.
-
Bake eggs in the oven for 20 to 28 minutes, flipping halfway through. Choose the total time based on your desired level of doneness: 20 minutes for very soft boiled, 28 minutes for fully hard boiled, or in between for jammy. See the chart in the post above for baking times in between.
-
Meanwhile, prepare a pot of ice water. As soon as you remove the eggs from the oven, immediately plunge them into the ice water, and leave them there for 10 minutes before eating or peeling.
LAST STEP: Leave a rating to help other readers, or tag me @wholesomeyum on Instagram. I’d love to hear from you!
Maya’s Recipe Notes
Serving size: 1 egg
- Tips: Check out my recipe tips above to help you to help you avoid brown spots, cook your eggs evenly without bursting, timing adjustments you might need, and the easiest way to peel.
- Storage: Keep them in an airtight container in the fridge. I recommend leaving them unpeeled, so they stay fresh for about a week, but you can peel them if you’ll use them within a couple days. Don’t freeze.
📖 Want more recipes like this? Find this one and many more in my Keto Ebook Bundle!
I provide nutrition facts as a courtesy. Have questions about calculations or why you got a different result? Please see my nutrition policy.
Add Your Notes Your Notes
Try More Of My Recipes


© Copyright Maya Krampf for Wholesome Yum. Please DO NOT SCREENSHOT OR COPY/PASTE recipes to social media or websites. We’d LOVE for you to share a link with photo instead.
Hard Boiled Eggs In The Oven


85 Comments
Michelle H
1Tried this and it worked out well! I don’t usually have ice at home so I used cold running water. Which made a 25 minute cooking time the equivalent of your 28-minute eggs. But I did notice an error in your post when you talked about the myth of exploding eggs. You said, “as long as you follow my time chart, you SHOULD have explosions while cooking eggs in the oven.” I imagine you meant shouldn’t haha!
Wholesome Yum
0Good catch, Michelle. 🙂 Corrected!
Bill
0Thank you!
Wholesome Yum D
0You’re very welcome, Bill! Let me know if you try more recipes.
Tammy Craft
0Maya, I have a silicone mini muffin pan which works perfectly.
Thanks for the tips!
Maya | Wholesome Yum
0That sounds perfect, Tammy!
Patricia
0Very Interesting.
Angeline Wright Meyer
0Sorry, but every one of mine burst. I followed your timeline-setting the time for the well cooked yolk. There was however no green around the yolk. Next time I will lower the temp-maybe my oven runs hot
Maya | Wholesome Yum
0Update: After further testing, I’ve adjusted the method and timing above slightly. Hope this helps!
Maya | Wholesome Yum
0Hi Angeline, Sorry to hear that happened! I tested this recipe with several dozen large eggs, but it’s possible it can vary by brand or like you said, by your oven. I would try pulling them a little sooner next time.
Kathy
0The recipe worked great however some of the eggs had a couple brown spots. Can you tell me why?
Maya | Wholesome Yum
0Update: I’ve adjusted the method above to prevent the issue with brown spots. Try it out and this should help!
Maya | Wholesome Yum
0Hi Kathy, I’m glad the recipe worked well for you! The brown spots are from where the eggs were touching the pan. They are fine to eat, but you can cut off those areas if you prefer. If you want to avoid this, you can rotate the eggs halfway through baking, but in my opinion it’s not worth the trouble.
Vicky
0Does it make any difference whether the eggs are cold(right out of fridge) or room temperature?
Maya | Wholesome Yum
0Hi Vicky, Yes, these times are based on cold eggs out of the fridge. They will take less time if they are at room temperature.
Carolyn
0Why does the oven version take longer, even at a higher temp, than the air fryer technique? I hae a convection toaster oven. Any idea how that will go? Thanks.
Maya | Wholesome Yum
0Hi Carolyn, Air fryers cook much faster than traditional ovens. I don’t have a convection toaster, so I’m not sure what the timing would be like in there. Let me know if you find something that works!
ralphie
0I gave away all my deceased mom’s muffin tins but have heard I can bake eggs directly on the RACK? Would this work? Great instructions! I LOVE pickled eggs and have been trying forever to find a way to ‘batch-produce’ a ton of eggs (48 count or more) at one go and boiling is such a time consuming slog.
Maya | Wholesome Yum
0Hi Ralphie, I have not attempted placing the eggs right on the rack, but I don’t recommend this because the direct heat contact will leave spots on your eggs.
Amanda
0For the times listed above, should I start with room temperature eggs, or eggs cold from the fridge?
Wholesome Yum D
0Hi Amanda, The times are based on fresh from the fridge.
Cheryl
0This was easy and they turned out well. A couple of the dozen cracked, so perhaps I should only cook ~ 28 minutes. I’ll keep trying!
Maya | Wholesome Yum
0This is an old comment, but I want to address anything that might help anyone reading (or you if you see this, Carol). After further testing, I’ve actually found that 28 minutes is perfect.
David
0Any positive or negative implications to piercing the wide end/air bubble of the eggs?
Maya | Wholesome Yum
0Hi David, I have not done this, but what would be your goal with doing that?
Phillis
0I checked several posts on this and not one of them mentioned small “brown” spots on the eggs. I’m guessing this is where the egg was “resting” on the muffin cup – !? Was not expecting this and was a little disappointed as I baked 12 for a family dinner.
Maya | Wholesome Yum
0Hi Phillis, This is an old comment and I’m sorry I missed it. In case you see this, I’ve adjusted the method and timing above to prevent the issue with brown spots. Hope this helps!
Pamela St George
0Two thumbs down for this method. Sounds great in theory, but not in practice. The eggs shrank on one end inside the shells giving them a caved-in appearance. About half were difficult to peel.
Maya | Wholesome Yum
0Hi Pamela, It’s pretty typical for the wide / air bubble end of eggs to have an area that pulls away from the shell. This happens with regular boiled eggs as well.
Dan
0As a long-haul truck driver I basically live out of my truck with only the toaster oven to cook in and have been doing this for quite some time. The inability to boil water in the truck made this a necessity and now I even do it when I have access to a full kitchen.
Jackie
0Hi Maya, does altitude affect how long to bake eggs in the oven? I know when I lived in the Caribbean (sea level), I don’t like to change up baking times and amounts – now I’m back living by the Rocky Mountains, so the altitude’s much higher. Thanks
Wholesome Yum M
0Hi Jackie, Yes, your location’s altitude will affect the outcome of your hard-boiled eggs. You can use this post as a guide, but I would do a bit of reading about making hard-boiled eggs at high altitudes before proceeding, as your cook times will probably need to be longer.
Fable
0This is not the first, second, or even third time I have tried to bake eggs. My first couple of endeavors were on the advice of Alton Brown, one of his numerous egg cooking videos. 99% of the time that man can do no wrong, but this was a disaster. He recommended a damp towel lining the oven rack, and then just line the eggs on the rack. I ruined two towels AND two dozen eggs. They had dark brown spots wherever they touched the metal, even with the thick, wet towel to supposedly help buffer them. They were near-impossible to peel. The second attempt I mentioned was just with a much wetter towel, hoping it wouldn’t burn like the first. It did. Same result with the eggs, too. I even wondered if the oven temp was wrong, and tested the interior. It was fine.
At some point, I don’t remember where the technique was from, but I tried baking eggs in shell again. This one was just putting them on a small rack with some water underneath for steam. Same. Thing. Again. Brown burned parts and peels that wouldn’t remove.
And sadly, I had an equally bad experience here. I thought to myself, “Hm! Maybe the muffin tin will keep them separate and protect them from overheating. Yeah, no, wrong. Browned bits wherever they touched the sides, and actually, the eggs were very inconsistent. Some of them were soft boil consistency, with parts of the white being like a jelly texture, even, while others were totally hard. Same problem with the shells. I wasted SO much egg here just peeling them, and I know every peeling trick out there. NONE of them worked.
So just as a thought: I feel like you should remove this or redirect it to your actual boiled-egg article. There are too many factors that can impact the results when you think about it. Are the eggs room temperature or cold when they go in? If they’re room temp, what is “room temp”? How large is large? What if someone’s oven is a few degrees off? (Most people don’t test to see if the temp is exactly on the nose very often, if at all.) What about differences in humidity and altitude? Is there any way to fix the ugly brown scorch marks without risking setting your house on fire by putting a towel in the oven? And on and on.
It’s great for you if you’ve got everything down to every single magical factor, where this works out for you. But I’ve tried repeatedly to bake eggs in shell, it’s always a total disaster, and there are other people here saying the same thing. Baking is too inconsistent to recommend to anyone, in my opinion, when they could be boiling their eggs and getting a perfect result. Even if this batch had come out properly cooked, there’s still the matter of the peels. I’ve never, ever baked them and not had them be horribly stuck to the shells, ice bath or no ice bath. And this particular time, I used a package of eggs that had been in my fridge for at least a week and a half; they weren’t ‘too fresh’ by any means.
At the very least, maybe encourage people to do a test run with a couple of eggs first, instead of throwing in a whole batch at once. And it’s also worth noting that I have done these baked eggs in shell experiments in different ovens, in different locations. It’s not ‘just me’, not my equipment, etc. It really is just a bad technique compared to boiling.
PS- Love most of your recipes. I made something similar to the cauliflower ziti tonight, and it was to die for. Just.. these eggs, sweetie. Nah.
Maya | Wholesome Yum
0Update: I’ve adjusted the method and timing above to prevent the issue with brown spots. Hope this helps!
Kathy
0I had the brown spot problem and I use jumbo eggs. I just put a piece of foil over the muffin pan and make indentations on the cups. The eggs don’t touch the metal so they don’t have brown spots. And I just added some time for larger eggs. No problem at all. Thanks for the recipe. It’s the one I use now too. With slight adjustment.
Maya | Wholesome Yum
0Thank you for the detailed feedback! This method isn’t for everyone, but many people find it convenient and have had success with it. If you prefer the stovetop, that’s perfectly fine – here’s my easy peel boiled eggs guide for the stove. If you did want to try this again, several readers have told me that using a silicone muffin pan eliminated the dark spots.
Andrew
0I tried this recipe tonight. I was excited to try something new. I only had them in for about 28 mins. The egg was burnt a bit on the side. I soaked them in cold water for 10mins. They were super hard to peel and looked burnt on the inside. The reason for 2 stars is for what happened. Not for your recipe. Any suggestions to try again
I will try again and see what happens. Thanks
Maya | Wholesome Yum
0Update: I’ve adjusted the method and timing above to prevent the issue with brown spots. Hope this helps!
Wholesome Yum M
0Hi Andrew, It sounds like your eggs were too close to the heating element. Try moving them further away from the heating element for your next attempt.
Debbie ARVIO
0I made these eggs the 1st time with extra lg eggs yesterday. They cam out perfect. Today I didn’t think and used jumbo and did the exact same thing, today they came out very soft boiled! What was i thinking? lol
I must admit though yesterday’s eggs did have a much creamer yolk then any I have ever had on top of stove.
Carol
0I followed your recipe exactly and they were brown when I peeled them. I ended up throwing 24 eggs away because of the brown spots.
Maya | Wholesome Yum
0Update: I’ve adjusted the method and timing above to prevent the issue with brown spots. Hope this helps!
Maya | Wholesome Yum
0Hi Carol, This method isn’t for everyone, but many people find it convenient and have had success with it. If you did want to try this again, several readers have told me that using a silicone muffin pan eliminated the dark spots. For future reference, if you do have brown spots, there’s no need to throw them away — you can just cut off that small area.
C.B.
0THIS IS GREAT! Being a single person I was finding less and less time for eating right. I can quickly grab a couple of eggs in the morning without the wait or watching the water. I use extra-large eggs so I was worried about timing, but the standard time worked out great. I was a bit disappointed with the brown spot on the egg when I used a metal cupcake pan, so the next time I use a silicone cupcake pan I have and it worked perfectly! Thank you.
Yvonne Bringle
0These always come out amazing! The only issue I have is that I get tiny “burnt” spots where the egg touches my muffin tin. I think that a silicone muffin tray might eliminate that issue, but I’m worried it might also extend the cooking time. Either way, these always come out SO good. Much easier than cooking on the stove top (and almost no mess to clean afterwards!).
Maya | Wholesome Yum
0I’m glad you like them, Yvonne! Yes, a silicone pan will help with the issue you are experiencing. My time chart above will work with a silicone pan. Enjoy!
Jody
0While I love the idea of this, I followed the directions exactly as stated. 325 for 30 minutes in a muffin tin. They came out as warm raw eggs. Well, the whites were a little opaque. I’m reheating my oven now and will put the same eggs back in for an additional 30 minutes. Hopefully, they will be done. It could be the difference in altitude, but I’m only at 4700 ft. Not sure where you are located.
Wholesome Yum M
0Hi Jody, I am not at high altitude, so I cannot test this, but I imagine it will take quite a bit longer in the oven for your eggs to cook through.
Everette Iorio
0I love the detail and most especially visuals . Thanks and can’t wait to try this out!
Donna
0I am still having problems with printing out recipes. Please go thru the steps again.
Maya | Wholesome Yum
0Hi Donna, To print recipes from my website, please use the ‘Print’ button located just above the recipe. This will open a new page and you can select print from there. Hope this helps!
Eleanor
0What temperature should the oven be set at?
Maya | Wholesome Yum
0Hi Eleanor, Set your oven to 325 degrees F. This info is on the recipe card and it looks like you missed it, so please go back above to read and make sure you don’t miss my tips and timing.
Debra White
0This is the best cooking tips I have ever found! I made 2 – 7 min eggs the 1st time, perfect!
Allison
0I must have have a hot oven. I was going for gooey at 23 minutes and got hard boiled instead.
I love marinated soft boiled eggs. Alas, I’ll have to eat the batch as is and try again next time.
I think I’ll try 17 or 18 minutes next time.
Wholesome Yum M
0Hi Allison, Everyone’s oven is slightly different. It may be helpful to invest in a thermometer you can leave in your oven to monitor temperature. If yours runs hot, then definitely pull them earlier.
James
0Hello I’ve enjoyed your articles on boiling and oven cooking eggs. An aspect that wasn’t addressed was energy used. I would find it interesting to know how much more energy was used for the different methods as compared to the bring to put in a pot bring to a boil and let them sit method.
Now it could be said that for all the times a person boils eggs it doesn’t matter. Yet as my mom would say, “Every little bit matters.” And who can argue with their mom.
Did love the photos of eggs cooked for different lengths of time.
All the best
James
Sharon
0Great point. I wonder if you could pop it in with your other food e.g. if roasting a chicken breast on another tray (not sure if it would slow cooking time as more stuff in oven). Then you could save energy as would have had to oven cook the chicken anyway.
Penny
0We have a weekly potluck after worship services. Everyone LOVES these eggs! I usually make 5 dozen at a time. I used to boil them in a huge pot – but the ones at the bottom always got overcooked – with a green surface on the yolks. This method gives me 100% perfect eggs!! (Well, except for any that burst- usually one a batch. Perhaps it is the ones with the thinnest shells? We have a friend give us some fresh eggs from their chickens. Those must have been very well-fed chickens because the shells were really thick. None of those burst! )
Marcia
0We live at 8,500 feet. Do you know how altitude affects the time or oven temperature? I’m used to experimenting with recipes that don’t include altitude adjustments, but I’d be grateful if you or any of your followers know the answer so I don’t have to waste eggs experimenting. Thank you!
Wholesome Yum M
0Hi Marcia, Yes, your location’s altitude will affect the outcome of your hard-boiled eggs. You can use this post as a guide, but I would do a bit of reading about making hard-boiled eggs at high altitude before proceeding, as your cook times will probably need to be longer.
Kortney
0I love how you broke this down. I have been a little skeptical about making eggs in the oven like this. Are there any texture differences?
Wholesome Yum
0No difference, Kortney!
Paula
0May I suggest you call them hard baked eggs or soft baked eggs? You are not boiling them in any water. You are just baking them in their shell. By the way I hard baked eggs following your instructions and they came out great. What a great idea.
Wholesome Yum A
0Glad you liked them, Paula! I call them hard boiled eggs because this technique creates similar results, and many people don’t know you can use an oven!
Adrianne
0Wow that is very interesting and you are right, no one wants to stand in front of the stove all morning! Great informative post. Cheers
Barb
0I tried doing the eggs in the oven. At the 30 minutes for hard, Where the egg touched my muffin pans they burned
Maya | Wholesome Yum
0Update: I’ve adjusted the method and timing above to prevent the issue with brown spots. Hope this helps!
Maya | Wholesome Yum
0Hi Barb, Everyone’s oven is a little different, so I recommend checking a few minutes earlier to see if they are done.
Regina Fulton
0Have you attempted it in a toaster oven?
Regina
0Well… I gave it a try and it worked beautifully!!! 28 minutes in the toaster oven and perfect eggs!
Maya | Wholesome Yum
0Hi Regina, Sorry, I haven’t!
Margaret E Clegg
0This may seriously be one of the most brilliant things I have ever seen! Thanks for including the visual chart.
Jules Shepard
0Always looking for simplicity! We can never seem to keep hard boiled eggs around here! Thanks for sharing!
Michele
0Cooked large eggs from the fridge for 20 minutes and they came out rock hard. My husband has banned me from cooking them this way ever again.
Maya | Wholesome Yum
0This is a very old comment, but I’m coming back to address any questions I missed in case it helps other readers. There is no way that cold, large eggs straight out of the fridge will be rock hard after 20 minutes, unless something is wrong with your oven. 🙂 Michele, if you see this, I hope you get the chance to review my new tips!
Patty
0What oven temperature?
Maya | Wholesome Yum
0Hi Patty, The temp is on the recipe card above.
Vic Regi
0Hi there,
Love your site! In the text explanation of the oven temp you have 350 degrees. The recipe card states 325 degrees. Which temp do you recommend?
Maya | Wholesome Yum
0Hi Vic, Thank you for catching that! I fixed it – it’s 325 degrees.
Judy
0Hi Maya, thanks so much for the chart. I’ve been baking my eggs in the oven but never thought to cook them for less time for a softer egg. Btw, I did have 1 egg burst in the oven. I was cooking 6, and the other 5 came out perfectly cooked. I have no clue as to why that happened.
Jenn
0I just baked a dozen and 6 burst. No idea why that happened either.
Maya | Wholesome Yum
0Hi Jenn, Sorry to hear that happened. It sounds like your oven doesn’t heat evenly, so next time I recommend rotating the pan halfway through, and make sure to flip them as well.
Leo
0Should the eggs be at room temperature or fresh from the refrigerator before putting in oven? Thanks. Looking forward to cooking hard boiled eggs in the oven!
Maya | Wholesome Yum
0Hi Leo, The times are based on fresh from the fridge.