 Shop
Shop My
My Custom


FREE 5-Ingredient Recipe EBook
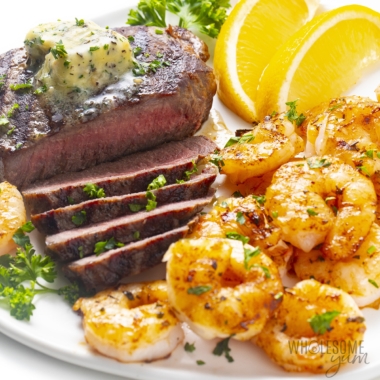
GET IT NOWChuck eye steak is one of those underrated cuts that doesn’t get much attention, but there are so many reasons it deserves a spot on your table. I make it when I want something smaller and more cost effective than a ribeye, but still special. If you’re unfamiliar with this cut — or if you’ve got it and are wondering what to do with it — I’m here to help you cook it perfectly. Choose the oven or grill (I’ve got both options), and make this chuck eye steak recipe with me!
Why You Need My Chuck Eye Steak Recipe

- Juicy, tender texture every time – Beef chuck eye steak always makes me feel like I’m eating a ribeye, minus the price tag. There’s a reason people call it “poor man’s ribeye” — it has a similar texture and beefy flavor! But like any steak, it’s the cooking method that makes or breaks it. I’ll show you 2 cooking methods (oven or grill), with handy tips to make it perfectly tender.
- Easy to make – Cooking chuck eye steak is a lot like cooking a ribeye, so simple is best. I much prefer my basic seasoning plus herb butter over a lengthy marinade.
- Budget friendly – You don’t have to spend a fortune to feel like you’re at a steakhouse! That’s one reason alone to add this cut to your rotation.


Ingredients & Substitutions
Here I explain the best ingredients for my beef chuck eye steak recipe, what each one does, and substitution options. For measurements, see the recipe card.
- Chuck Eye Steaks – This budget-friendly cut of meat comes from the fifth rib of the cow, close to chuck roasts (yes, the kind I use for pot roast or barbacoa) and the ribeye (which comes from the 6th to 12th ribs). Sometimes I see them labeled as chuck filet steak or Delmonico steak. Don’t confuse chuck eye steak with chuck steak — they are not the same, and chuck steak is very tough, so needs a totally different cooking method!
- Olive Oil – Avocado oil works great, too.
- Herb Butter – I usually make some variation of my compound butter recipe, but this time opted for a simple mix of salted butter, rosemary, and thyme. Feel free to add minced garlic, too. I don’t like dried herbs for herb butter, but if that’s all you’ve got, replace each tablespoon of fresh with 1 teaspoon of dried.
- Sea Salt & Black Pepper – Basic to let the beefy steak flavor shine! I recommend a teaspoon of salt and 1/4 teaspoon of pepper per pound of meat. If you want something bolder, my Texas brisket seasoning or Montreal seasoning are both great for steaks.

How To Cook Chuck Eye Steak
I have step-by-step photos here to help you visualize the recipe. For full instructions with amounts and temperatures, see the recipe card.
Whether you’re cooking chuck eye steak on the grill or in the oven, the method is almost the same. Here’s how I do it:
- Season and rest the steaks. Pat the steaks dry, season with the salt and pepper, and let them sit for 20 minutes. (This lets the salt get into the meat for better flavor, and also brings your steaks closer to room temperature for more even cooking.)
- Make the herb butter. Meanwhile, mash the butter and herbs in a bowl. Wrap in plastic, roll into a log, and chill until firm.


- Sear to get a golden crust. Heat the oil in a cast iron skillet over medium-high heat, or brush your grill grates with oil and preheat. Sear the steaks on each side, or grill over direct heat, until golden brown.
- Bake in the oven, or grill at lower heat. See my time and temperature chart below!
- Rest and enjoy! Let the steaks rest, then slice up the butter and place a pat on top. Serve and watch it melt into perfection.


Cook Time Chart
How long it takes to cook chuck eye steak depends on how thick it is, your cooking method, and how you like it done. I cooked my 1.5-inch-thick steaks shown here for 4 minutes in the oven, after searing each side for 2 minutes on the stove. Use my chart to get the doneness you like:
| Desired Doneness | Searing Time (per side) | Oven Time (after searing) | Grill Time (after searing) | Internal Temperature* |
|---|---|---|---|---|
| Rare | 2 minutes | 3-4 minutes | 1-2 minutes | 120 degrees F |
| Medium Rare | 2 minutes | 4-5 minutes | 2-3 minutes | 130 degrees F |
| Medium | 2 minutes | 5-6 minutes | 3-4 minutes | 140 degrees F |
| Medium Well | 2 minutes | 6-7 minutes | 4-5 Minutes | 150 degrees F |
| Well-Done | 2 minutes | 7-8 minutes | 5-6 minutes | 160 degrees F |
My tips on this:
- 1-inch-thick steaks will cook faster. In fact, you might not even need extra time at lower heat to get them to medium-rare!
- I highly recommend using a meat thermometer. My chart above can help, but the only way to know for sure is to measure. I use this probe thermometer that beeps when my chuck eye steak hits the perfect temp, but an instant-read thermometer works, too.
My Recipe Tips
- Look for steaks of the same thickness, at least 1 inch thick. Thinner steaks overcook more easily. I try to get ones that are 1.5 inches thick, but 1 inch is the minimum. And if they are different thicknesses, you’ll be pulling them off the heat one by one, which is a pain.
- Feel free to let the seasoned meat rest longer than 20 minutes. I just find this is the bare minimum, but you can leave beef chuck eye steaks out for up to 2 hours. You can even season the day before and keep in the fridge, but I still recommend letting them sit at room temperature for 20 minutes before cooking.
- Why pat the steaks dry? Dry meat makes a better sear (and a gorgeous crust), and will actually stay more juicy inside.
- For the oven method, use a cast iron skillet for the best crust. It holds heat like a champ and goes straight from stovetop to oven. Nonstick pans won’t get you the same nice crust (and are not ideal for such high heat anyway).
- Don’t squeeze when flipping. You can use a turner, but I find tongs easier — just use them gently. I like these tongs for cooking steaks inside and the ones from this set for grilling them.
- Rest on a cutting board, away from the heat. You probably know to pull your chuck eye steaks off the grill when they’re done, but the same goes for a cast iron pan! The residual heat will keep cooking them if you don’t remove them. And yes, resting is crucial to keeps all those delicious juices inside — instead of spilling out onto your plate.
- Slice against the grain. This makes your steak more tender and easier to chew. I like slices on the thin side for more tenderness.

Serving Ideas
What I serve with chuck eye steak usually depends on how I’m cooking it! Here are some ideas:
- Indoor sides – For steakhouse-inspired veggies, whip up my air fryer broccoli (that’s what I used in the pics!), crispy smashed brussels sprouts, creamed spinach, or garlicky roasted green beans. I also like to make baked potatoes in the Instant Pot, since they’re hands-off while I cook the steak.
- Grilled sides – You might as well grill asparagus or grill broccoli while you’re outside.
- Salads – Balance out the hearty beef with my creamy cucumber salad, loaded roasted cauliflower salad, or spring mix salad.
- Sauce – I think the herb butter in this chuck eye steak recipe is flavorful enough, but if you want a sauce, try my creamy mushroom sauce for richness or chimichurri for a fresh, herby kick.
Chuck Eye Steak Recipe (Oven Or Grill)
My easy beef chuck eye steak recipe transforms a budget-friendly cut into a juicy, tender steakhouse meal at home, using your oven or grill.
Ingredients
Tap underlined ingredients to see the ones I use.
Chuck Eye Steaks:
Herb Butter:
Instructions
Tap on the times in the instructions to start a kitchen timer.
Prep:
-
Use paper towels to pat the steaks dry (this will help get a better sear). Sprinkle steaks on both sides with salt and pepper. Let the meat sit at room temperature for 20 minutes (this will help with more even cooking).
-
Meanwhile, make the herb butter. In a small bowl, mash the butter with a fork. Add the herbs and mash again until well combined.
-
Place the butter on a sheet of plastic wrap, and wrap it in a log shape, twisting the ends. Refrigerate until firm. When you are ready to use it, slice the butter into tablespoon-sized pats.
Chuck Eye Steak In The Oven:
-
Preheat the oven to 450 degrees F (232 degrees C).
-
Heat the oil in a cast-iron skillet over medium-high heat for about 2 minutes, until very hot and shimmering.
-
Carefully place the chuck eye steaks in the hot oil and sear for about 2 minutes per side, until a browned crust forms on both sides.
-
Transfer the skillet to the preheated oven. Bake until the steaks reach your desired level of doneness.
For 1.5-inch-thick steaks: 3-4 minutes (120 degrees F) for rare, 4-5 minutes (130 degrees F) for medium rare, 5-6 minutes (140 degrees F) for medium, 6-7 minutes (150 degrees F) for medium well, or 7-8 minutes (160 degrees F) for well done. Steak temperature will increase by an additional 5 degrees when resting in the next step.
1-inch-thick steaks will be done faster, or may even be done to medium rare after step 3 without needing additional time at reduced heat.
-
Transfer the cooked chuck eye steaks to a plate or cutting board. Let them rest for 5-10 minutes before serving. Serve with a pat of compound butter and slice.
Grilled Chuck Eye Steak:
-
Oil the grill grates and preheat the grill to High for at least 15 minutes, until it reaches 500 degrees F (260 degrees C).
-
Place the chuck eye steaks on the grill. Close the lid and sear for 2 minutes. Flip the steaks over, close the lid again, and sear for 2 more minutes.
-
Reduce heat to medium-low. Continue to grill with the lid closed until they reach your desired doneness.
For 1.5-inch-thick steaks: 1-2 minutes (120 degrees F) for rare, 2-3 minutes (130 degrees F) for medium rare, 3-4 minutes (140 degrees F) for medium, 4-5 minutes (150 degrees F) for medium well, or 5-6 minutes (160 degrees F) for well done. Steak temperature will increase by an additional 5 degrees when resting in the next step.
1-inch-thick steaks will be done faster, or may even be done to medium rare after step 3 without needing additional time at reduced heat.
-
Remove from the grill and transfer to a plate or cutting board. Let the meat rest for 5-10 minutes before serving. Serve with a pat of compound butter and slice.
LAST STEP: Leave a rating to help other readers, or tag me @wholesomeyum on Instagram. I’d love to hear from you!
Maya’s Recipe Notes
Serving size: 5 ounces (1/2 of a 10-oz chuck eye steak)
- Tips: Check out my recipe tips above to help you select your steaks, get the perfect crust, and get juicy results.
- Time chart: See my time and temperature chart above to cook your steak perfectly, including tips on timing.
- Store: Cover leftovers and keep in the fridge for up to 3-4 days. They’re perfect for my steak salad!
- Meal prep: Feel free to prepare the herb butter a few days ahead, or even freeze it for a few months. You can also season the steak the day before.
- Reheat: My favorite way to reheat is the air fryer for 1-2 minutes. If you don’t have one, the next best is the oven at 250 degrees F until almost warm, then finish in a pan over medium-high heat for 1 minutes per side to refresh the crust.
- Freeze: Wrap tightly and freeze for up to 3 months. Thaw overnight in the fridge. You can also freeze raw chuck eye steaks for up to a year.
I provide nutrition facts as a courtesy. Have questions about calculations or why you got a different result? Please see my nutrition policy.
Add Your Notes Your Notes
Try More Of My Recipes


© Copyright Maya Krampf for Wholesome Yum. Please DO NOT SCREENSHOT OR COPY/PASTE recipes to social media or websites. We’d LOVE for you to share a link with photo instead.
Chuck Eye Steak


11 Comments
Janet
0Chuck eye steak: I have a glass stove and can’t use cast iron. Suggestions?
Maya | Wholesome Yum
0Hi Janet, You can use cast iron on a glass top stove, you just have to be gentle with it. This recipe will work with any oven-safe pan, though. It just turns out best in cast iron.
Wendy
0They came out beautiful!
Maya | Wholesome Yum
0Thank you, Wendy!
Laura Naughton
0Perfection! This recipe for chuck eye steak helped us prepare a steak-house worthy meal for my husband’s birthday. Tender (we cooked it to medium doneness), the steak was not only flavorful but delicious! Our only modification was sprinkling dried Rosemary directly on the steak before placing on the grill (instead of an herbed topping later). You’ll definitely want to try this recipe!
Guilianna Howiler
0My husband was shocked how perfectly these came out!! He was so skeptical about the inexpensive cut of meat, but I saw potential! I found your recipe & went for it! I made my compound butter w/ cilantro & basil, because that’s what I had on hand, tasted great! Thank you for an easy step by step recipe!!!-Guilianna
Amy
0Hi! Is there an alternative if I don’t have a grill or cast iron skillet? Thank you!
Maya | Wholesome Yum
0Hi Amy, I highly recommend cast iron for any steak — it’s really a game changer. You can try it in another oven safe skillet (choose the heaviest one you have!), but it won’t brown the same way and is more likely to overcook.
Samantha
0Super easy and healthy recipe. The best part is that it only takes 25 minutes! The steak comes out so tender. Thank you for sharing this yummy recipe!
Laura Reese
0I loved this steak! The easy step by step and clear directions helped it come out perfectly! Very budget friendly way to cook steak for my whole family.
Jessica
0This turned out wonderful! My kids even said it’s a new favorite recipe for our dinner routine!